参考:【itheima】
[toc]
Spring概述
Spring概况
- 特征:
    * 开源框架,企业级应用,轻量级
    * 核心:控制反转(IOC),面向切面(AOP)
    * 松耦合,低入侵,简化java开发
- Spring官网
    * 官网:http://spring.io/
    * Spring包下载:http://repo.springsource.org/libs-release-local/org/springframework/spring
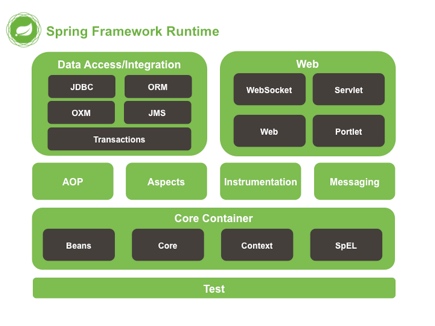
Spring框架图
![Spring01 Spring01]()
Spring的IOC容器
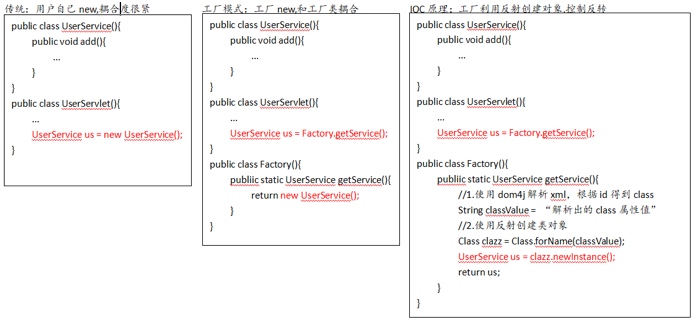
IOC底层实现原理
* 涉及技术:XML配置文件,dom4j解决XML,工厂,设计模式,反射
* 分析IOC实现原理
![Spring02 Spring02]()
IOC操作的两种方式
* 配置文件
* 注解
IOC开始案例(xml方式)
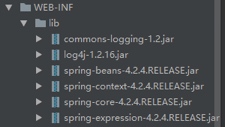
jar包:核心包4个+依赖包
![Spring04 Spring04]()
user类
1
2
3
4
5
| public class User {
public void add(){
System.out.println("add..........");
}
}
|
配置文件bean1.xml
路径和名字没做规定,但建议放在src下,官网建议名字applicationContext.xml
1
2
3
4
5
6
7
| <?xml version="1.0" encoding="UTF-8"?>
<beans xmlns="http://www.springframework.org/schema/beans"
xmlns:xsi="http://www.w3.org/2001/XMLSchema-instance"
xsi:schemaLocation="
http://www.springframework.org/schema/beans http://www.springframework.org/schema/beans/spring-beans.xsd">
<bean id="user" class="com.machine.ioc.User" />
</beans>
|
测试代码(junit)
1
2
3
4
5
6
7
8
9
10
11
12
13
14
| @Test
public void testUser(){
ApplicationContext context = new ClassPathXmlApplicationContext("bean1.xml");
User user=(User)context.getBean("user");
System.out.println(user);
user.add();
}
|
Spring的Bean管理:xml方式
bean实例化的3种方式
使用类的无参构造创建(重点)
1
| <bean id="user" class="com.machine.ioc.User" />
|
- 以上配置自动寻找User类的无参构造(没写默认有,写了有参构造必须显示写出无参构造才行)
- 若类没有无参构造报错
使用静态工厂创建
静态工厂类:
1
2
3
4
5
| public class Factory {
public static User getUser(){
return new User();
}
}
|
配置文件:
1
| <bean id="user" class="com.machine.ioc.Factory" factory-method="getUser"/>
|
测试代码:
1
2
3
| ApplicationContext context = new ClassPathXmlApplicationContext("bean1.xml");
User user = (User)context.getBean("user");
System.out.println(user);
|
使用实例工场创建
工厂类的方法为非静态方法
1
2
3
4
5
| public class Factory {
public User getUser(){
return new User();
}
}
|
配置文件
1
2
3
|
<bean id="factory" class="com.machine.ioc.Factory"/>
<bean id="user" factory-bean="factory" factory-method="getUser"/>
|
测试代码同上
bean标签常用属性
* id:根据id值得到配置对象,名字任取(不能有特殊符号),建议类名首字母小写;
* class:对象所在类的全路径;
* name:和id一样功能,但可以包含特殊符号,属于遗留问题,一般不用
* scope:bean的作用范围
    * singleton        :默认,单例,多次请求对应同一个对象
    * prototype        :多例,每次请求都创建新对象
    * request        :WEB项目,将对象存到request域中
    * session        :WEB项目,将对象存到session域中
    * globalSession:单点登录(一般不用)
属性注入
概念:创建对象时,向类里的属性注入值
属性注入的3种方式
set注入
1
2
3
4
5
6
7
8
9
| public class User{
private String name;
public void setName(String name){
this.name = name;
}
}
User user = new User();
user.setName("Tom");
|
有参构造注入
1
2
3
4
5
6
7
8
| public class User{
private String name;
public User(String name){
this.name=name;
}
}
User user = new User("Tom");
|
接口注入(很少用)
1
2
3
4
5
6
7
8
9
| public interface Dao{
public void delete(String name);
}
public class DaoImpl implements Dao{
private String name;
public void delete(String name){
this.name = name;
}
}
|
Spring支持的属性注入方式
[set注入]和[有参构造注入]
有参构造注入
1
2
3
4
5
6
7
8
9
10
11
12
| public class Bean2 {
private String name;
public Bean2(String name) {
this.name = name;
}
public void test(){
System.out.println("------"+name);
}
}
|
1
2
3
4
|
<bean id="bean2" class="com.machine.property.Bean2">
<constructor-arg name="name" value="Tom" />
</bean>
|
set注入(重点)
1
2
3
4
5
6
7
8
9
10
| public class Bean2 {
private String name;
public void setName(String name) {
this.name = name;
}
public void test(){
System.out.println("------"+name);
}
}
|
1
2
3
4
|
<bean id="bean2" class="com.machine.property.Bean2">
<property name="name" value="Marry"></property>
</bean>
|
对象类型的注入
Service类注入Dao对象
1
2
3
4
5
| public class UserDao {
public void add(){
System.out.println("dao.....");
}
}
|
1
2
3
4
5
6
7
8
9
10
| public class UserService {
private UserDao userDao;
public void setUserDao(UserDao userDao) {
this.userDao = userDao;
}
public void add(){
System.out.println("service.....");
userDao.add();
}
}
|
1
2
3
4
| <bean id="userDao" class="com.machine.property.UserDao" />
<bean id="userService" class="com.machine.property.UserService">
<property name="userDao" ref="userDao"/>
</bean>
|
名称空间P的注入方式(很少用)
1
2
3
4
5
6
7
8
9
10
11
12
13
14
15
16
17
18
19
20
21
22
| <!--引入P名称空间-->
<beans xmlns="http://www.springframework.org/schema/beans"
xmlns:p="http://www.springframework.org/schema/p"
xmlns:xsi="http://www.w3.org/2001/XMLSchema-instance"
xsi:schemaLocation="
http://www.springframework.org/schema/beans http://www.springframework.org/schema/beans/spring-beans.xsd">
<!--
使用 p 名称空间:
* 普通属性: p:属性名称=””
* 对象类型属性: p:属性名称-ref=””
-->
<bean id="car" class="com.machine.property.Car" />
<bean id="user" class="com.machine.property.User"
p:name="Marry" p:car-ref="car"></bean>
```
### 注入复杂类型
1. 数组
2. List集合
3. Map集合
4. properties类型
|
public class Bean3 {
private String[] arrs;
private List list;
private Map<String,String> map;
private Properties properties;
//省略set方法

public void test(){
    System.out.println(arrs);
    System.out.println(list);
    System.out.println(map);
 System.out.println(properties);
}
}
1
2
3
4
5
6
7
8
9
10
11
12
13
14
15
16
17
18
19
20
21
22
23
24
25
26
27
28
29
30
31
32
33
34
35
|
```xml
<bean id="bean3" class="com.machine.property.Bean3">
      <!--数组-->
      <property name="arrs">
         <list>
            <value>a</value>
            <value>b</value>
            <value>c</value>
         </list>
      </property>
      <!--List集合-->
      <property name="list">
         <list>
            <value>a</value>
            <value>b</value>
            <value>c</value>
         </list>
      </property>
      <!--map集合-->
      <property name="map">
         <map>
            <entry key="a" value="1" />
            <entry key="b" value="2" />
            <entry key="c" value="3" />
         </map>
      </property>
      <!--Properties的注入-->
      <property name="properties">
         <props>
            <prop key="username">root</prop>
            <prop key="password">123</prop>
         </props>
      </property>
   </bean>
|
IOC和DI的区别
1. IOC: 控制反转,把对象创建交给spring进行配置
2. DI: 依赖注入,向类里面的属性中设置值

3. 关系:依赖注入不能单独存在,需要在ioc基础之上完成操作
Spring的Bean管理:注解方式(推荐)
注解介绍
    1. 代码里面特殊标记,使用注解可以完成功能
    2. 注解写法 @注解名称(属性名称=属性值)
    3. 注解使用在类上面,方法上面 和 属性上面
Spring注解开发准备
导入jar包
1
2
3
| -导入基本的jar包
-导入aop的jar包:
spring-aop-4.2.4.RELEASE.jar
|
创建类,创建方法
在spring配置文件中 引入新约束 context
1
2
3
4
5
6
7
| <?xml version="1.0" encoding="UTF-8"?>
<beans xmlns="http://www.springframework.org/schema/beans"
xmlns:xsi="http://www.w3.org/2001/XMLSchema-instance"
xmlns:context="http://www.springframework.org/schema/context" xsi:schemaLocation="
http://www.springframework.org/schema/beans http://www.springframework.org/schema/beans/spring-beans.xsd
http://www.springframework.org/schema/context http://www.springframework.org/schema/context/spring-context.xsd"> <!-- bean definitions here -->
</beans>
|
开启注解扫描
1
2
3
4
5
6
| <!--开启注解扫描-->
<!--方式1:扫描包里的类,方法,属性-->
<context:component-scan base-package="com.machine.aop" />
<!--方式2:只扫描属性上的注解(很少用)-->
<!--<context:annotation-config />-->
|
使用注解创建对象
在类上使用注解
1
2
3
4
5
6
7
| @Component(value = "user") //等同 <bean id="user" class="com.machine.aop.User" />
public class User {
public void test(){
System.out.println("user..........");
}
}
|
创建对象的4个注解
-Spring提供@Component的3个衍生注解
    @Controller
    @Service
    @Repository
-目前来讲,4个注解功能一致,都创建对象,只是为了让标注类本身用途清晰
-Spring后续版本会对其增强
scope注解
1
2
3
4
5
| @Component(value = "user") //等同 <bean id="user" class="com.machine.aop.User" />
@Scope(value = "prototype") //多例
public class User {
//...
}
|
使用注解注入属性
@Autowired
1
2
3
4
| @Component(value = "userDao")
public class UserDao {
//...
}
|
1
2
3
4
5
6
7
8
9
| @Service
public class UserService {
//@Autowired原理:通过类名(UserDao)找,与 @Component(value = "userDao")的value无关
@Autowired
private UserDao userDao;
//注解方式不需要set方法
//...
}
|
@Resource
1
2
3
|
@Resource(name = "userDao")
private UserDao userDao;
|
XML和注解方式混合使用
1. 创建对象使用 配置文件
2. 注入属性使用 注解方式


