[TOC]
第3章 项目准备 3-1 案例环境初始化 之前演示了线程不安全case,接下来处理这个问题
环境搭建与准备:
1
2
3
4
- Spring Boot - Git管理代码 - Github - 使用git将初始化代码托管到[码云](教程参考:我的[使用git将初始化代码托管到[码云](项目初始化)](mweblib://15327623035290))
Packaging为war包
3-2 案例准备工作 一些注解的准备
1
2
3
4
5
6
7
8
9
10
11
12
13
14
15
import java.lang.annotation.ElementType; import java.lang.annotation.Retention; import java.lang.annotation.RetentionPolicy; import java.lang.annotation.Target; /** * 对于线程安全的类,加入一个@ThreadSafe注解的标示 * @Target(ElementType.TYPE) 说明作用于类上 * @Retention(RetentionPolicy.SOURCE) 指定注解作用的范围,在编译的时候就会被忽略掉 */ @Target(ElementType.TYPE) @Retention(RetentionPolicy.SOURCE) public @interface ThreadSafe { String value() default ""; }
1
2
3
4
5
6
7
8
9
10
11
12
13
import java.lang.annotation.ElementType; import java.lang.annotation.Retention; import java.lang.annotation.RetentionPolicy; import java.lang.annotation.Target; /** * 用来标示[线程不安全的类] */ @Target(ElementType.TYPE) @Retention(RetentionPolicy.SOURCE) public @interface NotThreadSafe { String value() default ""; }
1
2
3
4
5
6
7
8
9
10
11
12
13
import java.lang.annotation.ElementType; import java.lang.annotation.Retention; import java.lang.annotation.RetentionPolicy; import java.lang.annotation.Target; /** * 用来标记[推荐]的类或者写法 */ @Target(ElementType.TYPE) @Retention(RetentionPolicy.SOURCE) public @interface Recommend { String value() default ""; }
1
2
3
4
5
6
7
8
9
10
11
12
13
import java.lang.annotation.ElementType; import java.lang.annotation.Retention; import java.lang.annotation.RetentionPolicy; import java.lang.annotation.Target; /** * 用来标记[不推荐]的类或者写法 */ @Target(ElementType.TYPE) @Retention(RetentionPolicy.SOURCE) public @interface NotRecommend { String value() default ""; }
提交代码
3-3 并发模拟-工具 1 2 3 4 Postman:Http请求模拟工具 Apache Bench(AB):Apache的工具,测试网站性能 JMeter:Apache开发的压力测试工具 代码:Semaphone、CountDownLatch等
Postman
技巧1:设置环境
使用
技巧2:模拟并发
Apache Bench
下载安装:Mac命令行自带https://www.cnblogs.com/Ryana/p/6279232.html
1 ab -n 1000 -c 50 http://localhost:8080/test
请求数为1000 并发数为50
JMeter
说明:
1 2 线程数:虚拟用户的数量 循环次数:每个用户请求多少次
添加请求:
添加监听:
添加日志:
运行:
3-4 并发模拟-代码
1 2 3 4 5 6 7 8 9 10 11 12 13 14 15 16 17 18 19 20 21 22 23 24 25 26 27 28 29 30 31 32 33 34 35 36 37 38 39 40 41 42 43 44 45 46 47 48 49 50 51 52 53 54 55 56 57 58 59 60 61 62 63 64 65 66 67 68 69 70 package com.machine.concurrency.test; import com.machine.concurrency.annotations.NotThreadSafe; import lombok.extern.slf4j.Slf4j; import java.util.concurrent.*; /** * 并发测试:最大并发数为50次,每个线程(共5000个)都进行一次count++操作 * 测试结果:并发操作count++时,不做上锁处理,线程不安全,count最终达不到5000 */ @Slf4j @NotThreadSafe public class ConcurrencyTest { /** 请求总数 */ public static int clientTotal = 5000; /** 同时并发执行的线程数 */ public static int threadTotal = 50; public static int count = 0; public static void main(String[] args) throws InterruptedException { // 创建线程池 ExecutorService executorService = new ThreadPoolExecutor(0, Integer.MAX_VALUE, 60L, TimeUnit.SECONDS, new SynchronousQueue<>(), r -> new Thread(r,"测试线程")); // 信号量,闭锁 (允许同时50个并发) final Semaphore semaphore = new Semaphore(threadTotal); final CountDownLatch countDownLatch = new CountDownLatch(clientTotal); // 模拟并发请求 for (int i = 0; i < clientTotal; i++) { executorService.execute(()->{ try { // 请求一个信号,如果信号量小于clientTotal,则阻塞 semaphore.acquire(); add(); // 释放一个信号 semaphore.release(); } catch (InterruptedException e) { log.error("exception",e); } countDownLatch.countDown(); }); } // 阻塞直到countDown 的次数为threadTotal (主线程要等5000个线程执行完毕才能继续执行) countDownLatch.await(); // 关闭线程池 executorService.shutdown(); log.info("count:{}",count); } /** * 本质上应该是这个方法线程不安全 */ private static void add(){ //同时50个并发 进行count++操作,没有上锁,线程不安全 count++; } } /* CountDownLatch典型用法1:某一线程在开始运行前等待n个线程执行完毕。 将CountDownLatch的计数器初始化为n new CountDownLatch(n) , 每当一个任务线程执行完毕,就将计数器减1 countdownlatch.countDown(), 当计数器的值变为0时,在CountDownLatch上 await() 的线程就会被唤醒。 一个典型应用场景就是启动一个服务时,主线程需要等待多个组件加载完毕,之后再继续执行。 */
第4章 线程安全性 线程安全性定义
当多个线程访问某个类时,不管运行时环境采用何种调度方式 或者这些进程将如何交替执行,并且在主调代码中不需要额外的同步或协同 ,这个类都能表现出正确行为,那么就称这个类是线程安全的
三个方面
1 2 3 4 5 原子性:提供了互斥访问,同一时刻只能有一个线程来对它进行操作 可见性:一个线程对主内存的修改可以及时的被其他线程观察到 有序性:一个线程观察其它线程的指令执行顺序,由于重排序的存在,该观察结果一般杂乱无序
4-1 原子性-atomic 原子性-Atomic包
改进3-4的代码:
1 2 3 4 5 6 7 8 9 10 11 12 13 14 15 16 17 18 19 20 21 22 23 24 25 26 27 28 29 30 31 32 33 34 35 36 37 38 39 40 41 42 43 44 45 46 47 48 49 package com.machine.concurrency.example.count; import com.machine.concurrency.annotations.ThreadSafe; import lombok.extern.slf4j.Slf4j; import java.util.concurrent.CountDownLatch; import java.util.concurrent.ExecutorService; import java.util.concurrent.Executors; import java.util.concurrent.Semaphore; import java.util.concurrent.atomic.AtomicInteger; @Slf4j @ThreadSafe public class CountExample2 { // 请求总数 public static int clientTotal = 5000; // 同时并发执行的线程数 public static int threadTotal = 200; //互斥计数:每次只允许一个进行访问,保证了线程安全 public static AtomicInteger count = new AtomicInteger(0); public static void main(String[] args) throws Exception { ExecutorService executorService = Executors.newCachedThreadPool(); final Semaphore semaphore = new Semaphore(threadTotal); final CountDownLatch countDownLatch = new CountDownLatch(clientTotal); for (int i = 0; i < clientTotal ; i++) { executorService.execute(() -> { try { semaphore.acquire(); add(); semaphore.release(); } catch (Exception e) { log.error("exception", e); } countDownLatch.countDown(); }); } countDownLatch.await(); executorService.shutdown(); log.info("count:{}", count.get()); } private static void add() { count.incrementAndGet(); // count.getAndIncrement(); } }
1.AtomicXXX:CAS 、Unsafe.compareAndSwapInt
看一下AtomicInteger.getAndIncrement的源码
1 2 3 4 5 6 7 8 9 10 public final int getAndIncrement () return unsafe.getAndAddInt(this , valueOffset, 1 ); }
1 2 3 4 5 6 7 8 9 10 11 12 13 14 15 16 17 public final int getAndAddInt (Object var1, long var2, int var4) int var5; do { var5 = this .getIntVolatile(var1, var2); } while (!this .compareAndSwapInt(var1, var2, var5, var5 + var4)); return var5; }
1 2 3 4 5 6 7 8 9 public final native boolean compareAndSwapInt (Object var1, long var2, int var4, int var5)
2.AtomicLong、LongAdder
我们看到AtomicInteger在执行CAS操作的时候,是用死循环的方式,如果竞争非常激烈,那么失败量就会很高,性能会受到影响
再看一下1.8以后的LongAdder
1
2
3
4
5
6
7
8
9
10
public void add(long x) { Cell[] as; long b, v; int m; Cell a; if ((as = cells) != null || !casBase(b = base, b + x)) { boolean uncontended = true; if (as == null || (m = as.length - 1) < 0 || (a = as[getProbe() & m]) == null || !(uncontended = a.cas(v = a.value, v + x))) longAccumulate(x, null, uncontended); } }
补充知识点,jvm对long,double这些64位的变量拆成两个32位的操作
LongAdder的设计思想:核心是将热点数据分离,将内部数据value分成一个数组,每个线程访问时,通过hash等算法映射到其中一个数字进行技术,而最终计数结果为这个数组的求和累加,
3.AtomicReference、AtomicReferenceFieldUpdater
AtomicReference: 用法同AtomicInteger一样,但是可以放各种对象
1
2
3
4
5
6
7
8
9
10
11
12
13
14
15
16
17
18
19
20
21
22
23
import java.util.concurrent.atomic.AtomicReference;public class AtomicExample4 public static AtomicReference<Integer> count = new AtomicReference<>(0 ); public static void main (String[] args) throws InterruptedException System.out.println(count.compareAndSet(0 ,2 )); System.out.println(count.compareAndSet(0 ,1 )); count.compareAndSet(1 ,3 ); count.compareAndSet(2 ,4 ); count.compareAndSet(3 ,5 ); System.out.println(count.get()); } }
AtomicReferenceFieldUpdater
1
2
3
4
5
6
7
8
9
10
11
12
13
14
15
16
17
18
19
20
21
22
23
24
25
26
27
28
29
30
31
32
@Slf4j @ThreadSafe public class AtomicExample5 { @Getter private volatile int count = 100; /** * AtomicIntegerFieldUpdater 核心是原子性的去更新某一个类的实例的指定的某一个字段 * 构造函数第一个参数为类定义,第二个参数为指定字段的属性名,必须是volatile修饰并且非static的字段 */ private static AtomicIntegerFieldUpdater<AtomicExample5> updater = AtomicIntegerFieldUpdater.newUpdater(AtomicExample5.class,"count"); public static void main(String[] args) throws InterruptedException { AtomicExample5 example5 = new AtomicExample5(); // 第一次 count=100 -> count->120 返回True if(updater.compareAndSet(example5,100,120)){ log.info("update success 1:{}",example5.getCount()); } // count=120 -> 返回False if(updater.compareAndSet(example5,100,120)){ log.info("update success 2:{}",example5.getCount()); }else { log.info("update field:{}",example5.getCount()); } } }
4.AtomicStampReference:CAS的ABA问题
ABA问题:在CAS操作的时候,其他线程将变量的值A改成了B由改成了A,本线程使用期望值A与当前变量进行比较的时候,发现A变量没有变,于是CAS就将A值进行了交换操作,这个时候实际上A值已经被其他线程改变过,这与设计思想是不符合的
解决思路:每次变量更新的时候,把变量的版本号加一,这样只要变量被某一个线程修改过,该变量版本号就会发生递增操作,从而解决了ABA变化
1 2 3 4 5 6 7 8 9 10 11 12 13 14 15 16 17 18 19 20 21 22 23 24 public boolean compareAndSet (V expectedReference, V newReference, int expectedStamp, int newStamp) Pair<V> current = pair; return expectedReference == current.reference && expectedStamp == current.stamp && ((newReference == current.reference && newStamp == current.stamp) || casPair(current, Pair.of(newReference, newStamp))); }
5.AtomicLongArray
可以指定更新一个数组指定索引位置的值
6.AtomicBoolean(平时用的比较多)
compareAndSet方法也值得注意,可以达到同一时间只有一个线程执行这段代码
4-2 原子性-synchronized
synchronized修饰内容分类
1
2
3
4
5
6
7
修饰代码块 修饰方法 修饰静态方法 修饰类
1 2 3 4 5 6 7 8 9 10 11 12 13 14 15 16 17 18 19 20 21 22 23 24 25 26 27 28 29 30 31 32 33 34 35 36 37 38 39 40 41 42 43 44 45 46 47 @Slf 4jpublic class SyncronizedExample1 public void test1 () synchronized (this ){ for (int i = 0 ; i < 10 ; i++) { log.info("test1-{}" ,i); } } } public synchronized void test2 () for (int i = 0 ; i < 10 ; i++) { log.info("test2-{}" ,i); } } public static void main (String[] args) SyncronizedExample1 example1 = new SyncronizedExample1(); SyncronizedExample1 example2 = new SyncronizedExample1(); ExecutorService executorService = Executors.newCachedThreadPool(); executorService.execute(()-> example1.test1()); executorService.execute(()-> example2.test1()); } }
1
2
3
4
5
6
7
8
9
10
11
12
13
14
15
16
17
18
19
20
21
22
23
24
25
26
27
28
29
30
31
32
33
34
35
36
37
38
39
40
41
@Slf 4jpublic class SyncronizedExample2 public static void test1 () synchronized (SyncronizedExample2.class ) { for (int i = 0 ; i < 10 ; i++) { log.info("test1-{}" ,i); } } } public static synchronized void test2 () for (int i = 0 ; i < 10 ; i++) { log.info("test2-{}" ,i); } } public static void main (String[] args) SyncronizedExample2 example1 = new SyncronizedExample2(); SyncronizedExample2 example2 = new SyncronizedExample2(); ExecutorService executorService = Executors.newCachedThreadPool(); executorService.execute(()-> example1.test1()); executorService.execute(()-> example1.test1()); } }
原子性对比
1
2
3
4
5
synchronized: 不可中断锁,适合竞争不激烈,可读性好 Lock: 可中断锁,多样化同步,竞争激烈时能维持常态 Atomic: 竞争激烈时能维持常态,比Lock性能好;只能同步一个值
4-3 可见性 导致共享变量在线程中不可见的原因:
1
2
3
- 线程交叉执行 - 重排序结合线程交叉执行 - 共享变量更新后的值没有在工作内存与主内存间及时更新
java提供了synchronized和volatile 两种方法来确保可见性
JMM(java内存模型)关于synchronized的两条规定:
线程解锁前,必须把共享变量的最新值刷新到主内存
线程加锁时,将清空工作内存中共享变量的值,从而使用共享变量时需要从主内存中重新读取最新的值(注意,加锁和解锁是同一把锁)
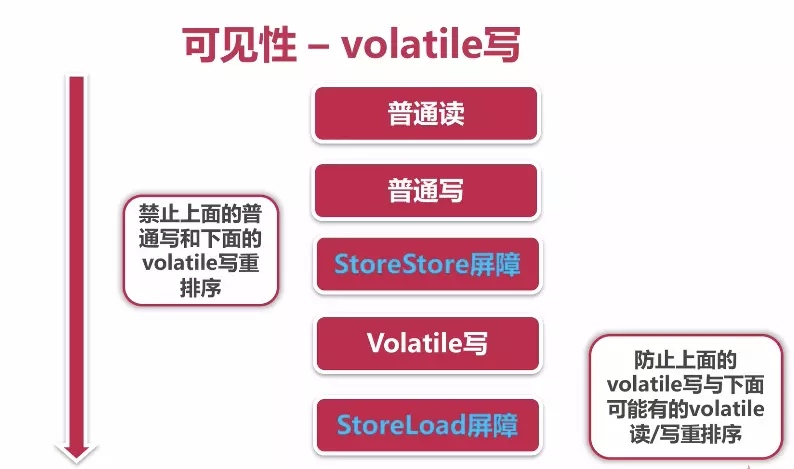
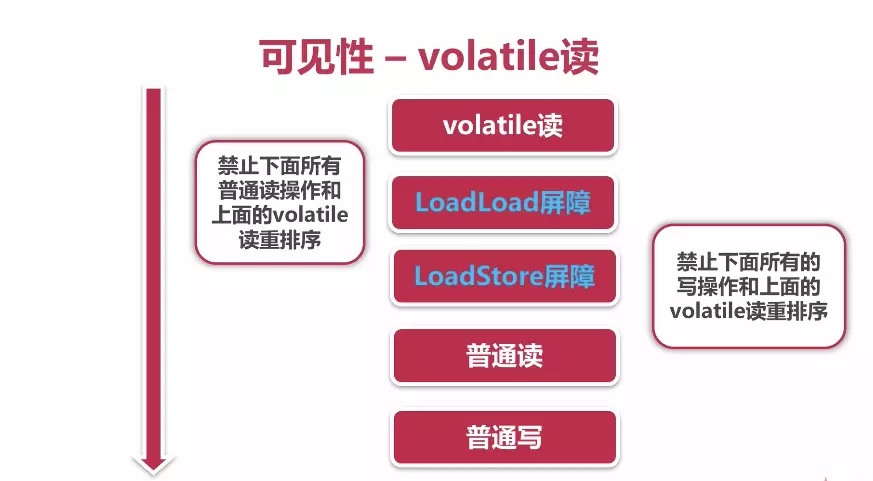
可见性-volatile:通过加入 内存屏障和禁止重排序优化来实现
volatile写示意图
volatile读示意图
1
2
3
4
5
6
7
8
9
10
11
12
13
14
15
16
17
18
19
20
21
22
23
24
25
26
27
28
29
30
31
32
33
34
35
36
37
38
39
40
41
/** * 并发测试 * @author gaowenfeng */ @Slf4j @NotThreadSafe public class CountExample4 extends AbstractExample{ /** 请求总数 */ public static int clientTotal = 5000; /** 同时并发执行的线程数 */ public static int threadTotal = 50; public volatile static int count = 0; public static void main(String[] args) throws InterruptedException { new CountExample4().test(); } /** * 本质上应该是这个方法线程不安全 * * volatile只能保证 1,2,3的顺序不会被重排序 * 但是不保证1,2,3的原子执行,也就是说还是有可能有两个线程交叉执行1,导致结果不一致 */ @Override protected void add() { // 1.取内存中的count值 // 2.count值加1 // 3.重新写会主存 count++; } @Override protected void countLog() { log.info("count:{}",count); } }
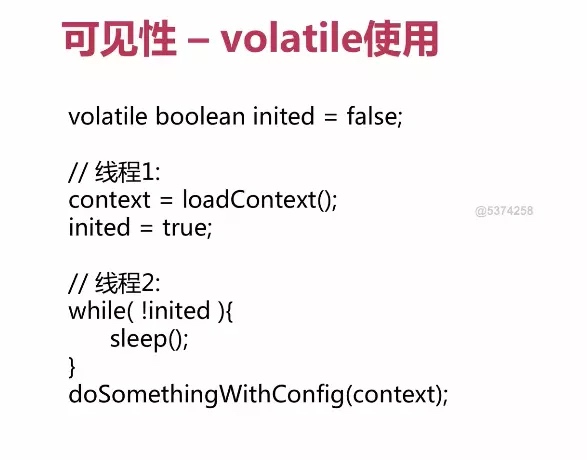
volatile使用条件
1.对变量写操作不依赖于当前值
综上,volatile特别适合用来做线程标记量,如下图
4-4 有序性
Happens-before原则
先天有序性,即不需要任何额外的代码控制即可保证有序性,java内存模型一个列出了八种Happens-before规则,如果两个操作的次序不能从这八种规则中推倒出来,则不能保证有序性(虚拟机可随意重排序)
程序次序规则:一个线程内,按照代码顺序,书写在前面的操作先行发生于书写在后面的操作。
(这里只是程序的运行结果看起来像是顺序执行,虽然结果是一样的,jvm会对没有变量值依赖的操作进行重排序,这个规则只能保证单线程下执行的有序性,不能保证多线程下的有序性)
锁定规则:一个unLock操作先行发生于后面对同一个锁的lock操作。
volatile变量规则:对一个变量的写操作先行发生于后面对这个变量的读操作。
传递规则:如果操作A先行发生于操作B,而操作B又线性发生于操作C,则可以得出操作A先行发生于操作C。
线程启动规则:Thread对象的start()方法先行发生于此线程的每一个动作。
线程中断规则:对现场interrupt()方法的调用先行发生于被中断线程的代码监测到到中断事件的发生。
线程终结规则:线程中所有的操作都先行发生于线程的终止检测,我们可以通过Thread.join()方法结束、Thread.isAlive()的返回值手段监测到线程已经终止执行。
对象终结规则:一个对象的初始化完成先行发生于他的finalize()方法的开始。
4-5 总结