第5章 统一配置中心
统一配置中心概述
出现的问题
- 不方便维护(多人开发)
- 配置内容的安全与权限(数据库密码)
- 更新配置后需要重启(文案)
统一配置中心
1
2
3
4
5
| 配置都放在git上(方便版本控制) ---> config-server <——>本地git
|
|
\|/
product、order从config-server拿配置
|
Config Server
创建config项目
创建远程git私有项目config-repo
pom
1
2
3
4
| <dependency>
<groupId>org.springframework.cloud</groupId>
<artifactId>spring-cloud-config-server</artifactId>
</dependency>
|
yml
1
2
3
4
5
6
7
8
9
10
11
12
13
14
15
16
| spring:
application:
name: config
cloud:
config:
server:
git:
uri: https://gitee.com/machine4869/config-repo.git
username: hhdwwt@163.com
password: XXXXXXX
basedir: /machine/codding/springcloud/config/src/main/resources/basedir
eureka:
client:
service-url:
defaultZone: http://localhost:8761/eureka/
|
启动类
1
2
3
|
@EnableDiscoveryClient
@EnableConfigServer
|
说明:
1
2
3
4
5
6
7
8
9
10
11
12
13
14
15
16
17
18
19
| 访问http://localhost:8080/order-dev.yml 可以查看从远程拉取的配置
1、关于路径格式
{name}-{profiles}.yml
/{lable}/{name}-{profiles}.yml
name 服务名
lable 分支(brunch 默认master)
访问路径:localhost:8080/release/order-dev.yml
2、配置格式变化
/order-a.yml
/order-a.properties
/order-a.json
3、加载顺序
order-dev.yml 会加载order.yml 再加载order-dev.yml(重复的内容会覆盖)
order.yml放公用配置
|
Config Client
pom
1
2
3
4
| <dependency>
<groupId>io.pivotal.spring.cloud</groupId>
<artifactId>spring-cloud-services-starter-config-client</artifactId>
</dependency>
|
先后?先载入本项目的配置:bootstrp.yml
yml
1
2
3
4
5
6
7
8
9
10
11
12
13
14
15
16
17
18
| spring:
application:
name: order
cloud:
config:
discovery:
enabled: true
service-id: config
|
验证远程配置已经拿到?注释掉了本地配置数据库的信息,但是仍然能从远程拿到数据库配置,正确启动。
Spring Cloud Bus自动更新配置
不需要重启应用?改了远程git就动态刷新?怎么做?
理论
1
2
3
4
5
6
7
8
9
10
11
12
13
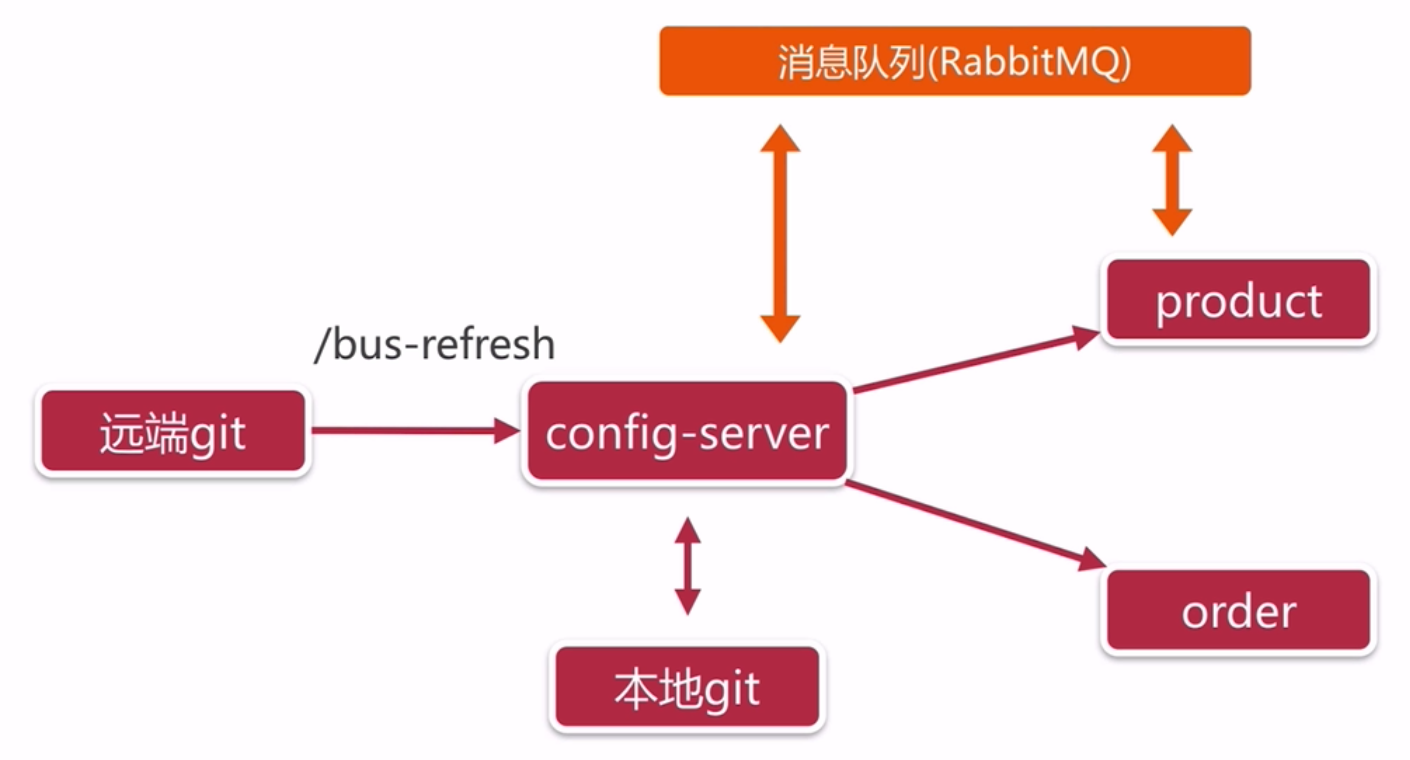
| bus:总线
1、关键:
git远程修改配置后 --> config-server能通知order
2、怎么通知?
消息队列:使用RabbitMQ
config-server使用Spring Cloud Bus后,对外暴露/bus-refresh接口
访问该接口config-server就会把更新信息发送到MQ
3、谁来访问接口?
git来访问最合适--webhook 只需要配置接口地址
|
实操
1、打通config和order的rabbitMQ
order、config项目都要改:
pom
1
2
3
4
| <dependency>
<groupId>org.springframework.cloud</groupId>
<artifactId>spring-cloud-starter-bus-amqp</artifactId>
</dependency>
|
yml
1
2
3
4
| spring:
rabbitmq:
host: 10.211.55.6
|
此时,rabbitMQ界面的Queues会出现2条
2、访问/bus-refresh触发 config通知 —rabbit—> order更新
yml
1
2
3
4
5
6
|
management:
endpoints:
web:
exposure:
include: "*"
|
测试:
1
2
3
4
5
6
7
8
9
10
| @RefreshScope
public class OrderController {
@Value("${girl.name}")
private String girlName;
@GetMapping("/getGirl")
public String getGirl() {
return "girlName:" + girlName;
}
}
|
解释
1
2
3
| 查看日志:Mapped "{[/actuator/bus-refresh],methods=[POST]}"
访问 POST /actuator/bus-refresh 代表通知更新:git通知 -> config通知 -> order更新
|
测试:
1
2
3
4
5
6
7
8
9
10
11
| @RefreshScope
public class OrderController {
@Value("${girl.name}")
private String girlName;
@GetMapping("/getGirl")
public String getGirl() {
return "girlName:" + girlName;
}
}
|
3、使用git的web-hook 触发接口
1
2
3
4
5
6
7
8
9
10
11
12
13
14
15
| 1、使用github提供的WebHooks
使用https://www.ngrok.cc提供的内网穿透
content-type 选 application/json 其他默认
config为webhook提供了专用接口 /monitor
2、
添加如下
<dependency>
<groupId>org.springframework.cloud</groupId>
<artifactId>spring-cloud-config-monitor</artifactId>
</dependency>
//此时 git修改 即可实时在order看到变化
|
第6章 消息和异步
异步和消息
异步:客户端请求不会阻塞进程,服务端的响应可以是非即时的
异步的常形态:
MQ应用场景:
- 异步处理(发短信)
- 流量削峰(秒杀:流量过大,通常加入消息队列控制活动人数,若消息队列长度超过最大数量,就抛弃请求)
- 日志处理(kafka、大数据)
- 应用解耦(用户下单后,订单服务通知商品系统[消息写入队列],商品服务订阅消息)
RabbitMQ基本使用
pom
1
2
3
4
| <dependency>
<groupId>org.springframework.boot</groupId>
<artifactId>spring-boot-starter-amqp</artifactId>
</dependency>
|
order \ message\MqReceiver
1
2
3
4
5
6
7
8
9
10
11
12
13
14
15
16
17
18
19
20
21
22
23
24
25
26
27
28
29
30
31
32
33
34
35
36
37
38
39
40
41
42
43
| package com.mxx.order.message;
import lombok.extern.slf4j.Slf4j;
import org.springframework.amqp.rabbit.annotation.Exchange;
import org.springframework.amqp.rabbit.annotation.Queue;
import org.springframework.amqp.rabbit.annotation.QueueBinding;
import org.springframework.amqp.rabbit.annotation.RabbitListener;
import org.springframework.stereotype.Component;
@Component
@Slf4j
public class MqReceiver {
@RabbitListener(bindings = @QueueBinding(
value = @Queue("myQueue"),
exchange = @Exchange("myExchange")
))
public void process(String massage){
log.info("MqReceiver: {}",massage);
}
@RabbitListener(bindings = @QueueBinding(
exchange = @Exchange("myOrder"),
key = "computer",
value = @Queue("computerOrder")
))
public void processComputer(String massage){
log.info("MqReceiver-processComputer: {}",massage);
}
@RabbitListener(bindings = @QueueBinding(
exchange = @Exchange("myOrder"),
key = "fruit",
value = @Queue("fruitOrder")
))
public void processFruit(String massage){
log.info("MqReceiver-processComputer: {}",massage);
}
}
|
发送测试
1
2
3
4
5
6
7
8
9
10
11
12
13
14
15
16
17
| @RunWith(SpringRunner.class)
@SpringBootTest
public class MqSendTest {
@Autowired
private AmqpTemplate amqpTemplate;
@Test
public void send(){
amqpTemplate.convertAndSend("myQueue","now "+new Date());
}
@Test
public void sendComputer(){
amqpTemplate.convertAndSend("myOrder","computer","now "+new Date());
}
}
|
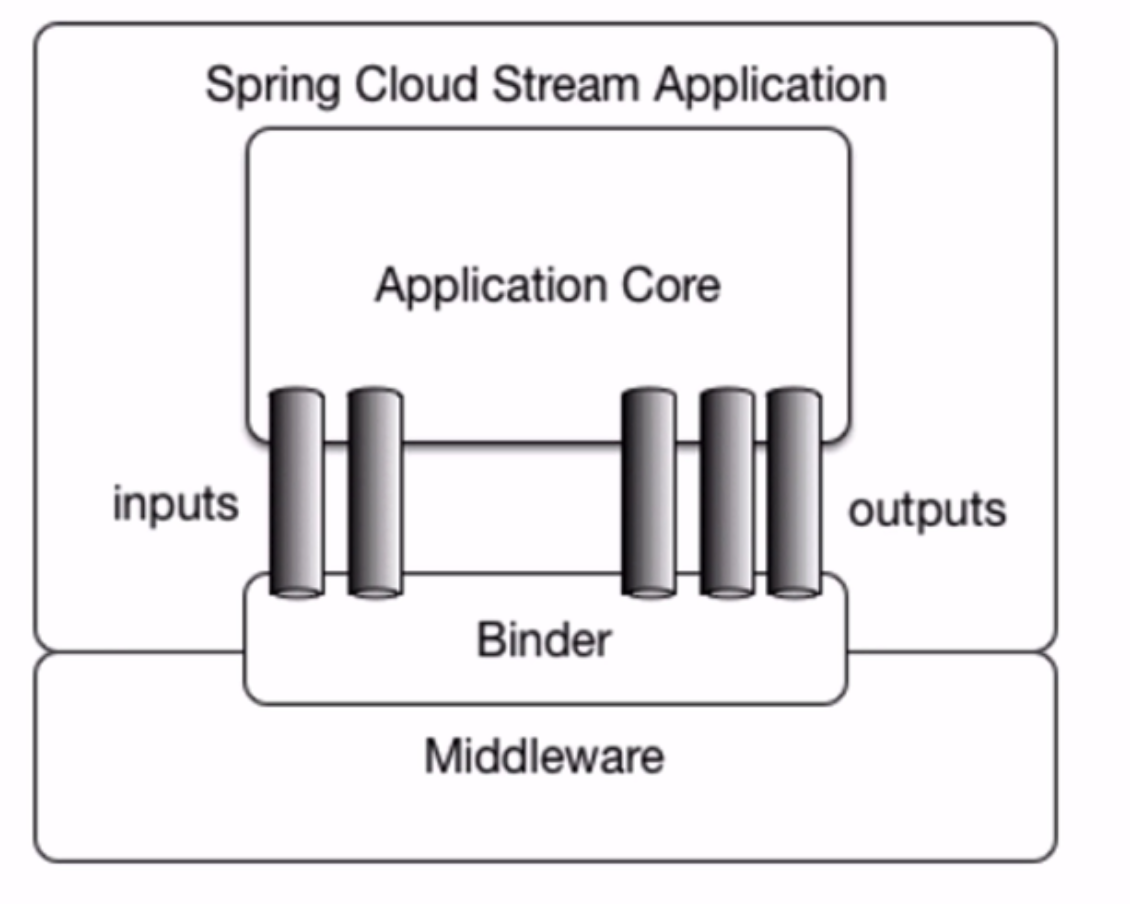
Spring Cloud Stream
理论:
- 为微服务应用构建消息驱动能力的框架
- 应用程序通过input\output与binder交互,binder与中间件交互
- 优势:对消息中间件进一步封装,可做到代码层面无感知\切换中间件
- 局限:目前只支持rabbitMQ和kafka
实操:
pom
1
2
3
4
| <dependency>
<groupId>org.springframework.cloud</groupId>
<artifactId>spring-cloud-starter-stream-rabbit</artifactId>
</dependency>
|
- 快速开始
message\StreamReceiver
1
2
3
4
5
6
7
8
9
10
11
12
13
14
| import org.springframework.cloud.stream.annotation.EnableBinding;
import org.springframework.cloud.stream.annotation.StreamListener;
import org.springframework.cloud.stream.messaging.Sink;
@Component
@EnableBinding(Sink.class)
@Slf4j
public class StreamReceiver {
@StreamListener(Sink.INPUT)
public void process(String message) {
log.info("StreamReceiver :" + message);
}
}
|
发送测试:
rabbit > queue > input.anonymous.L92bTj6FRTyOC0QE-Pl0HA > publish message > payload处输入一个hello world,点Publlish message发送一个消息
- 自定义消息发送接收
1
2
3
4
5
6
7
8
9
10
11
12
13
14
15
16
17
| package com.mxx.order.message;
import org.springframework.cloud.stream.annotation.Input;
import org.springframework.cloud.stream.annotation.Output;
import org.springframework.messaging.MessageChannel;
import org.springframework.messaging.SubscribableChannel;
public interface StreamClient {
String INPUT = "mxxInput";
String OUTPUT = "mxxOutput";
@Input(StreamClient.INPUT)
SubscribableChannel input();
@Output(StreamClient.OUTPUT)
MessageChannel output();
}
|
yml 、把输入输出流绑定到rabbit的同一个exchanges(topic)
1
2
3
4
5
6
7
8
| spring:
cloud:
stream:
bindings:
mxxInput:
destination: mxxMessage
mxxOutput:
destination: mxxMessage
|
启动后,默认是会创建一个临时队列,临时队列绑定的exchange为 “mxxMessage”
测试output
1
2
3
4
5
6
7
8
9
10
11
12
13
14
15
16
17
18
19
20
| package com.mxx.order.controller;
import com.mxx.order.message.StreamClient;
import org.springframework.cloud.stream.annotation.EnableBinding;
import org.springframework.cloud.stream.messaging.Source;
import org.springframework.messaging.MessageChannel;
import org.springframework.messaging.support.MessageBuilder;
@EnableBinding(StreamClient.class)
public class OrderController {
@Autowired
private StreamClient streamClient;
@GetMapping("sendMessage")
public void sendMessage(){
streamClient.output().send(MessageBuilder.withPayload("now "+new Date()).build());
}
}
|
- 分组与持久化
问题引出:同一应用中只需有一个实例消费该消息,但是不同实例现在都在消费“mxxMessage”里的消息
解释:默认创建的临时队列,程序关闭的时候,队列也会消失。我们需要一个持久化的队列,并且指定一个分组。当一个应用程序不同实例放置在一个具有竞争关系的消费组中,组里面的实例中只有一个能够消费消息
1
2
3
4
5
6
| spring:
cloud:
stream:
bindings:
input:
group: group-1
|
改进:
1
2
3
4
5
6
7
8
9
10
| spring:
cloud:
stream:
bindings:
mxxInput:
destination: mxxMessage
group: order
mxxOutput:
destination: mxxMessage
group: order
|
不同实例只会有一个在消费消息,默认轮训方式
- 传递对象
发送
1
2
|
streamClient.output().send(MessageBuilder.withPayload(orderDTO).build());
|
接收
1
2
3
4
5
|
@StreamListener(StreamClient.INPUT)
public void process(OrderDTO message) {
log.info("StreamReceiver: {}" ,message);
}
|
为了在rabbit页面方便调试,指定输出格式
1
2
3
4
5
6
| spring:
cloud:
stream:
bindings:
mxxInput:
contentType: application/json
|
点击“Get Messages”按钮可以查看消息
- 消费完后回应
关键: @SendTo
1
2
3
4
5
6
7
| @StreamListener(StreamClient.INPUT)
@SendTo(StreamClient.OUTPUT)
public String processInput(String message) {
log.info("StreamReceiver input: {}" ,message);
return "完成消费";
}
|
stream简化了消息队列的开发:不需要关注exchange…啥的
业务:商品和订单服务中使用MQ
业务分析
订单 <—库存变化— 消息队列 <—库存变化— 商品
订单拿到库存变化消息后,将数据记录到redis里
库存变化场景:
以扣库存为例使用消息队列
实操
1、改成统一配置中心
2、在product 扣库存的地方发送消息
pom
1
2
3
4
| <dependency>
<groupId>org.springframework.boot</groupId>
<artifactId>spring-boot-starter-amqp</artifactId>
</dependency>
|
service
1
2
3
4
5
6
7
8
9
10
11
| @Autowired
private AmqpTemplate amqpTemplate;
@Override
public void decreaseStock(List<DecreaseStockInput> decreaseStockInputList) {
amqpTemplate.convertAndSend("productInfoOutputList", JsonUtil.toJson(productInfoOutputList));
}
|
yml :配置mq
测试:在rabbit创建队列观察
3、在order 接收消息,将消息存到redis
使用docker安装redis
1
| $ docker run -d -p 6379:6379 hub.c.163.com/library/redis:latest
|
pom
1
2
3
4
| <dependency>
<groupId>org.springframework.boot</groupId>
<artifactId>spring-boot-starter-data-redis</artifactId>
</dependency>
|
yml:redis配置
message/ProductInfoReceiver
1
2
3
4
5
6
7
8
9
10
11
12
13
14
15
16
17
18
19
20
21
22
23
24
25
26
27
28
29
| package com.mxx.order.message;
import org.springframework.amqp.rabbit.annotation.Queue;
import org.springframework.amqp.rabbit.annotation.RabbitListener;
import org.springframework.data.redis.core.StringRedisTemplate;
@Component
public class ProductInfoReceiver {
private static final String PRODUCT_STOCK_TEMPLATE = "product_stock_%s";
@Autowired
private StringRedisTemplate stringRedisTemplate;
@RabbitListener(queuesToDeclare = @Queue("productInfoOutputList"))
public void process(String message){
List<ProductInfoOutput> productInfoOutputList = (List<ProductInfoOutput>)JsonUtil
.fromJson(message, new TypeReference<List<ProductInfoOutput>>(){});
for (ProductInfoOutput productInfoOutput : productInfoOutputList){
stringRedisTemplate.opsForValue().set(
String.format(PRODUCT_STOCK_TEMPLATE,productInfoOutput.getProductId()),
String.valueOf(productInfoOutput.getProductStock()));
}
}
}
|
业务:异步扣库存分析
保证数据一致性!
- 可靠的消息投递
- 用户体验变化
- 改为异步需要考虑很多细节问题来保证一致性!如果高并发需求不大慎用!
(高并发场景的业务方案:秒杀等,结合redis,缓存,事务,分布式事务,一致性)